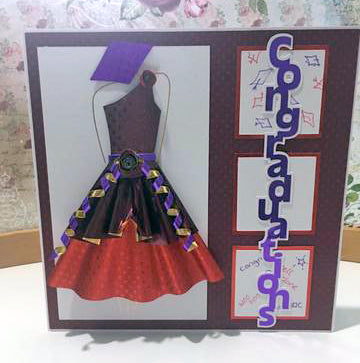
Rinea Vineyard Pack: Congratulations Graduate Card
by Natalie Ballard


You will need:
- Rinea Vineyard Foiled Paper Pack
- Glue Gun
- Pen & Paper for sketching the layout
- Paintbrush for forming twizzles
- Stamping card
- Stamps or pens for doodling

Let’s get going…
Start by sketching your layout so you get the rough design for your dress to a standard where you feel confident with the proportions. Keep it loose as things will change once you move on to forming the shapes out of the foiled paper.
I also sketched a few rough card layout designs so the dress didn't overtake the card base in size.

For the dress form, I revisited my old pattern cutting skills starting with the base layer of the skirt and building my way upwards.
The Skirt Base Layer
Start by cutting a semi-circle of Ruby Starstruck and cutting out a smaller semi-circle in the center of the straight edge slightly wider than what you want your finished "waist" size to be. Bear in mind, by the time the skirt is pleated, this center semi-circle will have leveled out to a gentle curve.
I created one piece with a variation in the radius so I could judge length and pleating before cutting out my finished piece. I'd recommend using an off-cut or Misfit for this piece.

The Long Peplum Skirt Overlay
Put two vertical rectangle pieces of the Merlot together with the Merlot facing each other. From the top-left corner cut a quarter of a circle (I used a small reel of tape as a template).
Working with the cut off corner top left, measure your preferred length for the center front hem length (the short edge and this will finish at center front of your dress).
On the long edge on the left-hand side, measure your preferred length of the outside of the peplum skirt.
Cut between your two measurements in a nice round curve; a french curve can help you get the right curve.
I then pleated this according to my initial sketch. Once pleated, check your work against your skirt so you can see if you need to trim the piece at all at the waist. I also fanned out my skirt a little more than I had originally planned to help the pieces fit better.

Cutting the Bodice
I cut the bodice using a combination of the basic sketch shape and working from the finished skirt waist as a guide. I did allow a slight amount extra to allow for a little extra shaping using a Tonic ball tool (a very large ball tool used for flower shaping).
For the sample shown, I used the Merlot Starstruck foiled paper.

Putting the dress together
The best (and quickest) way to adhere pieces of Rinea to each other is a hot glue gun. As I knew I would be working on the edges of elements, I pulled out my trusty heat mat. This will both protect my work surface, but also give me a nice flat surface on the back of my piece.
As we are using a glue gun, I also recommend using a little finger protection such as a rubber or silicone thimble.
Tidying the Skirt
Wrap the edges of the peplum around the edges of your skirt so it wraps nicely. You can even apply a little glue here too if it fights back.
You can also fill any gaps in the waist between the peplum and the main skirt.

Shaping the bodice
Reinforce any shaping to the bodice before adhering, particularly if your design has any darts. Again, I just used the Tonic ball tool to do this.
Adhering the Bodice
Use a little glue at the top of the peplum and overlay the bodice over the top; keep an eye on the edges of the skirt so your bodice sits slightly outside of this.
Decorating the Bodice
Start by cutting three slim strips (c. 3mm) of violet glossy foiled paper. Twizzle two of these around a paintbrush to form thin spirals. I recommend using the glossy for this step as it is a little more resilient at this size.
The other strip forms the waistband.

Making the Miniature Roses
Originally I had planned to make both violet and ruby roses, but after the first two, it looked perfect. Cut small spirals in your chosen colors bearing in mind the width of the spiral will set how much the flower protrudes from the dress. You also want this spiral to be quite rough so once rolled it doesn't just look like quilling.

To make the card
Photograph on a grid
For positioning, I photographed my dress on my cutting mat so I could plan my card layout. To see how I did this, see our Facebook Live.
Cut out and adhere all your layers using your usual glue; top with the dress using a hot glue gun as the dress is so 3D.