Shades Of Blue Wall Art Inspiration
by Roni Johnson

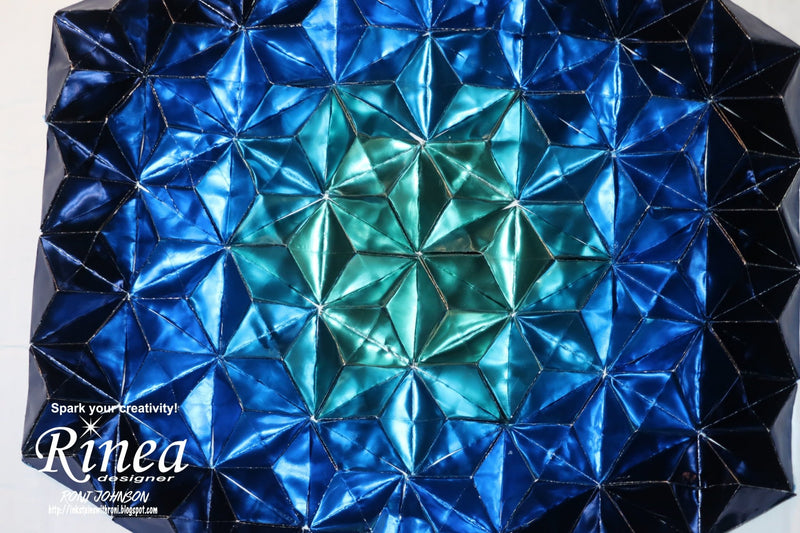
Hello, everyone! I am so excited to share my origami wall art piece that I made using the brand new Shades of Blue Variety Pack!! Blue is my favorite color and this variety pack is a must have! Included in the pack are the colors: Turquoise/Gold Glossy, Sapphire/Gold Glossy, Cobalt/Gold Glossy, and Midnight/Gold Glossy.

Isn't this just amazing? This piece is made up of lots and lots of origami double pyramids - 51 of them to be exact. I will show you the basic design of the double pyramids and then you can create any shape or design you would like by simply replicating the pyramids in your choice of colors.

Step 1 - Cut the foiled paper into a square. I am using a 4" square for the example (approx. 3.75" finished size) but you could use any size you like.

Step 2 - Fold the square in half, crease, and open it back up.

Step 3 - Rotate the paper 1/4 turn, fold, crease, and open.

Your square should look like this now.

Step 4 - Take one outside edge and fold it to meet the center line, crease (leave closed).

Step 5 - Repeat step #4 on the opposite side. You now have what looks like two squares on each side of the centerline.

Step 6 - Fold the lower right-hand corner up to meet the top of the centerline, crease, and unfold.

Step 7 - Fold the upper right-hand corner to meet the bottom of the centerline, crease, and open. You now have an "X" through the right-hand square.

Step 8 - Fold the lower left-hand corner so it meets the top of the centerfold line, crease, and open.

Step 9 - Fold the upper left-hand corner down so it meets the bottom of the centerfold line, crease, and open.

At this point, it will look like you have an "X" on each side of the center fold line.

Step 10 - Fold opposite corners under as shown.

Step 11 - Choose an end to begin with. Slightly lift the folded end up, following the fold lines, squeeze together then 3 sections of the end as shown. Tuck it under the folded corner. This will result in a pyramid form on that end.

This is what it will look like after the end has been tucked under the flap.

Step 12 - Rotate your paper to the other end and repeat step 11 by pinching, and tucking to create a second pyramid.

Step 13 - At this point, you have two pyramids but depending on where your center crease is it may also look like a little boat. If it does look like a boat, gently push on the "bottom of the boat" upwards along the crease line as shown below.

By doing this you will turn your boat into two pyramids standing side by side. I should note that at times this will automatically happen when you perform steps 11 and 12. It just depends on how much pressure you apply when you fold and tuck.

And now you have a double pyramid

Now repeat these steps to make the desired/necessary number of pyramids to create your design. You will need 51 for the example design in the following colors: 6 Turquoise/Gold Glossy; 9 Sapphire/Gold Glossy; 15 Cobalt/Gold Glossy and 21 Midnight/Gold Glossy.

Step 14 - You can affix your origami wall art to the desired base...canvas, artboard, wood, chipboard, metal, etc. I am using a piece of cardboard which has been painted with white acrylic paint.
Step 15 - Find the center of your base and mark two guidelines for alignment purposes.

Step 16 - Glue the center of your design down to the base using the pencil marks as your guide.
Step 17 - Continue gluing all of the pyramids down to the base.


Supplies:
Rinea - Blue Variety Pack
DecoArt - Americana Snow White (Titanium)
Beacon - 3 in 1 Adhesive